Add Row
Add Element
chambers first class connections kc
update

Explore JOCO Businesses
​​​​​​​and Home Improvement Contractors

update
Add Element
  • Home
  • Olathe Home Services
    • Lawn and Landscape
    • Tree Care
    • Kitchen Remodel
    • Outdoor Gardens
    • Home Remodel
    • Handy Man
    • Grilling Outdoors
    • Pools and Outdoors
    • Deck Remodeling
    • Basement Remodeling
    • Water & Ai Purification
    • Outdoor Kitchens
  • Restaurants For Contractors
  • Business Directory
  • Local Reviews
  • Work Wear
  • Homeowner Tips
  • Relocate 2 Kansas City
  • Celebrity Stories
  • Auto Storys
  • Business Directory
  • Home Tips
July 16.2025
2 Minutes Read

Transform Your Garden: Essential Raspberry Trellis DIY Tips

DIY raspberry trellis idea with raspberry plants.

Unlock the Secret to Thriving Raspberry Plants

If you're dreaming of a kitchen garden bursting with fresh raspberries, it's not just about planting; it's also about providing the right support! Trellising your raspberry plants is crucial for keeping them healthy and productive. Not only does it prevent the canes from becoming a tangled mess, but it also significantly eases harvesting and improves airflow, reducing the risk of diseases.

Why Trellis Your Raspberries?

Raspberry plants are zealous growers. Without a proper trellis system, they can take over your garden and turn it into a chaotic mess. Did you know that trellising helps you maintain order and promotes better fruit quality? An effective trellis setup helps your raspberry plants remain upright and supported, enhancing their exposure to sunlight, which is vital for juiciness and flavor.

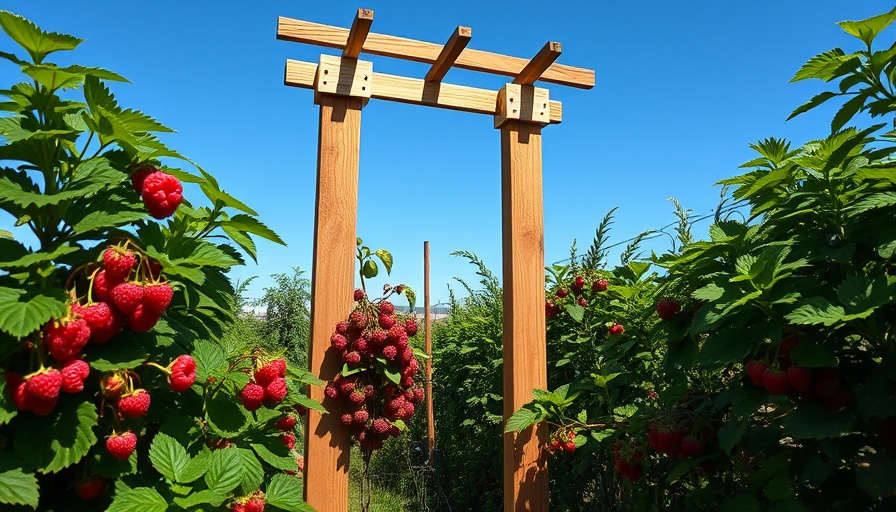
Exploring DIY Trellis Options

Ready to get started? Here are three DIY trellising options suited for different garden spaces and personal preferences:

T-Post Trellis: The Simple Solution

This method is a fantastic choice if you have a narrow patch. Using metal T-posts, you can string a wire between the posts to support your raspberry canes planted in a single line. This design is budget-friendly, easy to install, and adaptable, allowing room for future expansions.

Pros: Affordable, straightforward installation, and flexible.

Cons: You'll need to tie up canes regularly, and without maintenance, it can become messy.

T-Trellis Containment System: A Personal Favorite

In my garden, I've adopted a T-Trellis system nestled in a raised garden bed. This design not only supports the canes but also contains new growth effectively. However, I learned that regular pruning is necessary to ensure easy access to the fruit and to maintain airflow.

While it did take some time for me to get used to caring for the contained system, the payoff is worth it as my raspberries grow beautifully!

Invest in Your Berry Future

Choosing the right trellis method can have a profound impact on your raspberry harvesting experience. Raspberries need support, and taking the time to invest in a good trellising system will pay off for years to come, yielding a bountiful supply of juicy berries perfect for summer treats.

As you embark on your raspberry growing journey, reflect on the commitment you want to make towards maintaining your garden. Whether you opt for a simple T-Post system or the more involved T-Trellis method, the joy of harvesting your homegrown raspberries will surely make your gardening efforts worthwhile!

Get Started with Your Raspberry Garden Today!

Encouraged by the thrill of cultivating your garden? Start planning your raspberry trellis today, and embrace the satisfaction of home gardening. Believe me, the experience of biting into your fresh berries is truly unbeatable!

Outdoor Gardens

Write A Comment

*
*
Related Posts All Posts

DIY Privacy Screen Ideas: Transform Your Outdoor Space Today!

Update Finding Your Perfect Outdoor Oasis: DIY Privacy Solutions In the hustle and bustle of everyday life, having a secluded spot in your backyard or patio can transform your outdoor area into a personal oasis. Many of us dream of enjoying our morning coffee without the prying eyes of neighbors or busy streets, and with a touch of creativity, you can easily achieve that privacy. DIY privacy screens not only serve a functional purpose but can also enhance the aesthetic of your outdoor space. Popular DIY Ideas for Backyard Privacy Screens Wood is a popular choice for crafting DIY privacy screens. It cuts across styles, allowing you to opt for a rustic feel or a more modern design. Here are some inspired ideas: Deck Privacy Screens: An easy DIY project showcased by The Sweetest Digs can be adapted for various outdoor settings. With step-by-step instructions, anyone can create a sleek screen that blends into their surroundings. Cedar Plank Screens: For a sophisticated touch, The Happy Housie presents a guide to making a privacy screen using various cedar plank widths, providing a high-end look without breaking the bank. Faux Pergola Curtains: If you seek elegance, check out Thrifty & Chic for a quick build that costs less than $100. This curtain privacy solution adds charm while still being budget-friendly. Lattice Trellis Screens: A classic yet stylish option is a lattice screen. These can also support climbing plants, adding a vibrant touch to your yard. Gina Michele shares a creative way to combine a planter with a lattice screen for added flair. Budget-Friendly and Accessible Options You don’t need to spend a fortune to create your privacy sanctuary. For under $150, you can build a chic privacy screen with a chevron design from DIY Passion. These designs often incorporate simple materials and can be customized to fit your style. Gardening for Privacy: The Natural Approach If you prefer a greener alternative, consider incorporating plants into your privacy solutions. Tall shrubs or strategic hedges can act as a natural screen, creating a serene backdrop while also contributing to your garden's biodiversity. Real-Life Examples to Inspire Your Project Projects like a planter attached to your privacy screen not only make for a stunning visual but are also functional. Imagine a screen that not only shields you from your neighbors but also blooms with seasonal flowers! These multifunctional designs can even help declutter your yard. Embracing Your DIY Spirit Building your outdoor privacy screen is not just about creating a barrier; it's an opportunity to express your creativity and improve the space you're in. Furthermore, DIY projects involve everyone—friends, family, or neighbors can join in, turning a simple build into a memorable experience. Let’s Build Your Sanctuary! Now that you have the ideas and inspiration, it’s time to roll up your sleeves and get started on your DIY privacy screen project. Don't hesitate to invite friends or family to join in the fun. Let your imagination soar, and soon you'll have a stunning and private outdoor space to enjoy! If you're feeling inspired, check out more DIY guides and tips to enhance your outdoor spaces. Transform your backyard into your dream retreat today!

Start Seeds in Egg Cartons: A Budget Gardening Hack for Everyone

Update Unlocking the Secrets of Budget Gardening Starting a garden can often feel overwhelming, especially for first-timers bombarded with endless product recommendations. However, a garden doesn't need to be an expensive venture. One clever way to start seeds without breaking the bank is by using something you likely already have in your kitchen: egg cartons. This budget gardening hack not only saves money but also reflects eco-friendly practices that are increasingly vital today. Choosing the Right Seeds to Grow Egg cartons are surprisingly versatile for seed starting. While they work well for herbs like basil and cilantro, they're also excellent for growing tomatoes and peppers. However, some plants, like cucumbers and zucchini, generally thrive better when sown directly into the ground due to their sensitivity to transplant shock. Understanding which seeds to start in egg cartons can simplify planning your garden and set you up for success. The Importance of Quality Soil One of the keys to successful seed starting is using a seed starting mix instead of a regular potting mix. Seed-starting mixes are sterile and prevent fungal infections, ensuring your seedlings have the best chance of survival. If standard potting mix is your only option, make sure to eliminate larger chunks that could hinder small seeds. This small detail can make a significant difference in your garden’s outcome. Setting Up Your Seed Station Utilizing an egg carton gives you 12 compartments for planting, which theoretically allows you to start 48 seedlings if you plant two seeds per hole. Though it might seem counterintuitive to plant multiple seeds and then thin them out, this practice improves the odds of successful germination, ensuring that at least one or two seedlings thrive in each compartment. Environmentally Friendly and Convenient This method is not just economical; it’s also environmentally friendly! Once your seedlings are ready to transplant, you can place the entire egg carton into the ground, as the cardboard is biodegradable. This is a notable advantage over plastic seed trays that contribute to landfill waste. What to Expect and Next Steps As you embark on your gardening adventure using egg cartons, it’s essential to regularly check on your seedlings. Make sure they have adequate light and moisture but avoid overwatering to prevent damping-off diseases. With patience and care, watching your seedlings sprout can lead to a rewarding gardening experience that not only beautifies your home but also offers fresh herbs and vegetables for your kitchen. Ready to explore the world of gardening? Start with this easy and cost-effective hack today!

Create Your Perfect Garden: Essential Plants for Attracting Hummingbirds

Update Why Hummingbirds Matter in Your Garden If you’ve ever watched a hummingbird zip through your garden, you know how magical these tiny creatures can be. Their rapid wing beats and iridescent feathers add life to vegetable plots, flower beds, and any outdoor space. Attracting hummingbirds can enrich your garden not only through their beauty but also by aiding in pollination. They play a crucial role in the ecosystem by visiting flowers and transferring pollen, which helps a variety of plants thrive. Top Plants to Attract Hummingbirds Building a hummingbird-friendly garden doesn’t require extensive knowledge. Here are some of the best plants that hummingbirds love, as shared by fellow gardeners and horticultural experts: Salvia: This widely loved plant comes in various colors and is a reliable nectar source for hummingbirds. Its tubular flowers make it easy for these birds to sip nectar. Bee Balm (Monarda): Known for its vibrant spiky blooms and minty fragrance, bee balm attracts not just hummingbirds but many other pollinators. It's an essential part of any hummingbird garden. Fuchsia: Perfect for cooler regions, fuchsia's drooping red flowers are always a hit. These plants often thrive in shady spots, making them versatile for different garden layouts. Coneflower (Echinacea): While not their favorite, hummingbirds do enjoy coneflowers. They add visual interest with their striking purple petals and attract various pollinators. Creating a Welcoming Environment To keep hummingbirds coming back, it's not just about having the right plants. They appreciate a tranquil environment, so try to limit disturbances and keep your garden free from pesticides. Providing a source of fresh water, such as a bird bath with a fountain, can also enhance your garden’s appeal. Adding bright colors and using plant combinations that bloom at different times can ensure that your garden remains a hotspot for these enchanting creatures throughout the seasons. Success Stories from Gardeners Many gardeners have shared their success with these plants. One noted, "My hummingbirds love the red bee balm and cardinal flower; they’re often the most visited plants here!" The community feedback has shown how specific plants yield remarkable results, further lifting spirits and drawing families to enjoy nature together. Planting Tips for Every Gardener If you’re new to gardening, starting with a few pots of salvia or fuchsia is a great way to begin. Ensure you check your local growing zone to help select the best plants for your garden conditions. It’s also beneficial to purchase plants from local nurseries, where you can find varieties that thrive in your area. Whether your garden is large or limited to a small balcony or patio, there’s always room for these lovely plants. As you nurture your plants and watch for hummer visits, you will find joy and calm that comes with gardening. Consider joining local gardening communities or online forums to share your experiences. Plus, interacting with other gardening enthusiasts can open your eyes to new plants and techniques! Start creating your perfect hummingbird haven today, and watch as these charming birds become regular visitors in your garden!

Terms of Service

Privacy Policy

Core Modal Title

Sorry, no results found

You Might Find These Articles Interesting

T
Please Check Your Email
We Will Be Following Up Shortly
*
*
*